In this article, you will not only learn about what is FastAPI and CRUD operations in Python FastAPI, but also explore several important topics such as creating a Python virtual environment, working with SQLAlchemy ORM, designing SQL schemas, and building a complete backend application using Python and FastAPI.
FastAPI is a lightweight Python framework that has gained massive popularity in recent years, especially with the rise of AI and GenAI applications. Let’s understand how FastAPI works, its core features, and why it’s different from other Python frameworks.

Features of FastAPI
Here are a few major features of FastAPI that make it stand out from other Python frameworks and help us understand how FastAPI works under the hood.
- Asynchronous Nature: FastAPI is built on Starlette, which is an ASGI framework. This allows it to handle multiple requests asynchronously and efficiently. If you’ve ever wondered how FastAPI handles multiple requests, this asynchronous design is the key.
- API Documentation: It automatically generates interactive API documentation using Swagger UI and ReDoc, making it easier for developers and stakeholders to test and understand the API.
- Pydantic Support: FastAPI integrates with Pydantic for data validation and serialization. You can define data models to validate request bodies and automatically convert responses into JSON format.
- Dependency Injection: This feature works like middleware for each API endpoint, providing cleaner, modular, and more testable code.
- Authentication and Authorization: FastAPI supports authentication methods like JWT and OAuth2, making secure API development straightforward.
- Real-time Communication: It supports WebSocket connections for real-time data exchange, ideal for chat apps, dashboards, or live updates.
Building a CRUD Application Example with FastAPI
For this CRUD example FastAPI project, we’ll build a simple eCommerce backend where we can create, read, update, and delete products. This hands-on approach will help you understand CRUD operations FastAPI in a real-world context.
Before jumping into the implementation, let’s go through the main Python packages we’ll use in this project.
Packages Used in This Application
- FastAPI: As discussed earlier, FastAPI is a lightweight Python framework for building scalable APIs. It includes powerful features such as automatic API documentation, dependency injection, authentication, authorization, real-time communication with WebSockets, and asynchronous capabilities.
You’ll also learn FastAPI how to run your app locally and see how FastAPI works with asynchronous requests. - Uvicorn: It’s an ASGI web server that runs FastAPI applications. It listens for HTTP requests and serves responses efficiently. You can use the command Uvicorn run FastAPI to start your server.
- SQLAlchemy: It’s an Object Relational Mapper (ORM) that helps create database schemas and interact with SQL databases using Python classes and objects.
- Pydantic: Used for validating and serializing Python objects, particularly request and response data in FastAPI.
- SQLite: SQLite is a lightweight, file-based relational database that stores all tables and data in a single
.dbfile. In this project, we’ll perform FastAPI CRUD operations using SQLite for simplicity. Later, you can switch to PostgreSQL or MySQL.
SQL databases follow a relational model with fixed schemas, ensuring data consistency, security, and efficient management.
Note: We’re using SQLite to keep this tutorial simple and easy to follow. Later, you can configure your own SQL or PostgreSQL database. SQLAlchemy (the ORM) will help you manage schemas and perform queries on any SQL database seamlessly.
Create and Activate a Virtual Environment
In Python, a virtual environment is an isolated workspace where all the dependencies you install are contained within that specific environment and do not affect other projects. This is especially useful when you’re building multiple applications that may require different versions of the same package.
Creating and activating a virtual environment ensures a clean setup for your FastAPI tutorial and avoids dependency conflicts.
Run the following commands in your terminal:
python3 -m venv venv
source venv/bin/activate
Once the environment is activated, you can install the required dependencies.
Install Required Python Packages
Use the following command to install all the necessary packages for this FastAPI CRUD operations project:
pip install fastapi uvicorn sqlalchemy pydantic python-dotenv
pip install httpx anyio pytz
This command installs FastAPI, Uvicorn, SQLAlchemy, and other utilities needed for building a complete backend system.
If you’re wondering how to install FastAPI, the first pip install fastapi command handles that.
After installation, you’ll be ready to create your database models and routes for your CRUD FastAPI Python project.
Project Folder Structure and Database Setup
After installing the required packages for your FastAPI CRUD operations project, the next step is to organize your application folder structure. This structure keeps your code modular, readable, and scalable.
Here’s the suggested folder structure:
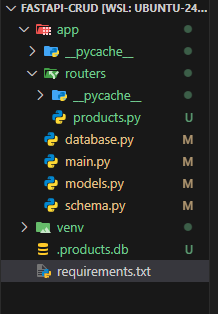
Now, in the root folder, create a new directory called app. Inside this folder, we’ll store all the core files such as database connections, models, schemas, and routes for our CRUD operations in Python FastAPI application.
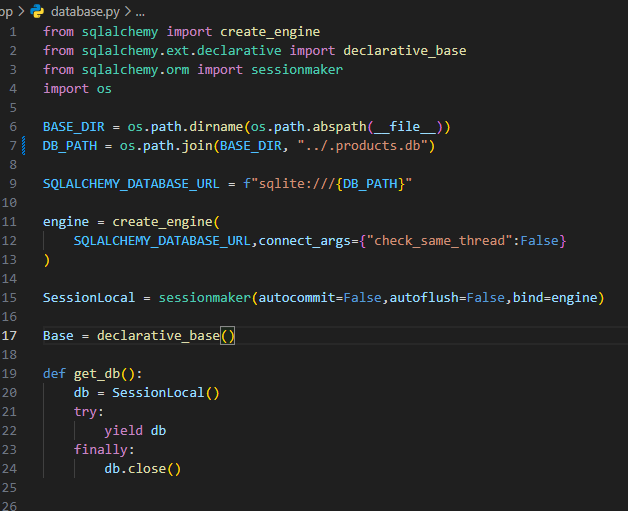
app/database.py
In this file, we’ll establish a connection to the database, define a base class for ORM models, and generate a database session. This session will be used as a dependency in each API route for data access.
Explanation:
BASE_DIR: Returns the current directory of this file (database.py).DB_PATH: Goes one folder up (../) and creates a file named.products.db.
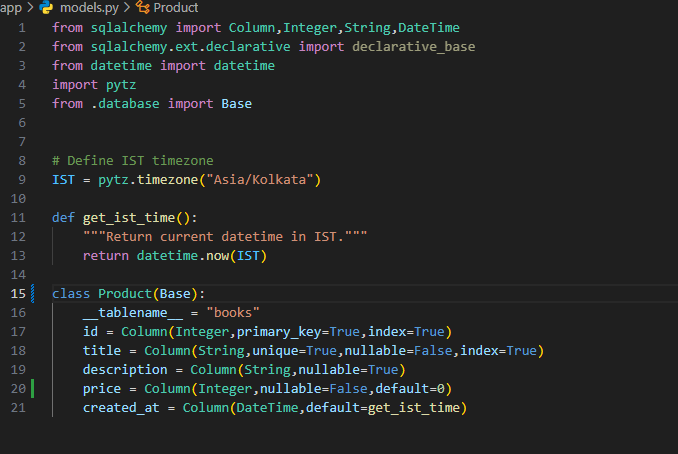
app/models.py
This file is where we’ll design our database schema using SQLAlchemy ORM.
For our CRUD example FastAPI project, we’ll define a Product schema with attributes such as id, title, description, price, and created_at.
idis an auto-incrementing primary key starting from 1.created_atautomatically stores the product creation timestamp using a helper function (e.g.,get_ist_time).
app/schema.py
This file contains Pydantic schemas that define the structure of request and response data.
These schemas validate incoming request bodies and serialize Python objects into JSON responses for FastAPI.

Main Application and Router Setup
Now let’s look at the main entry point of our FastAPI project , the main.py file.
This is where the FastAPI application starts running, and all routes, database connections, and modules are initialized.
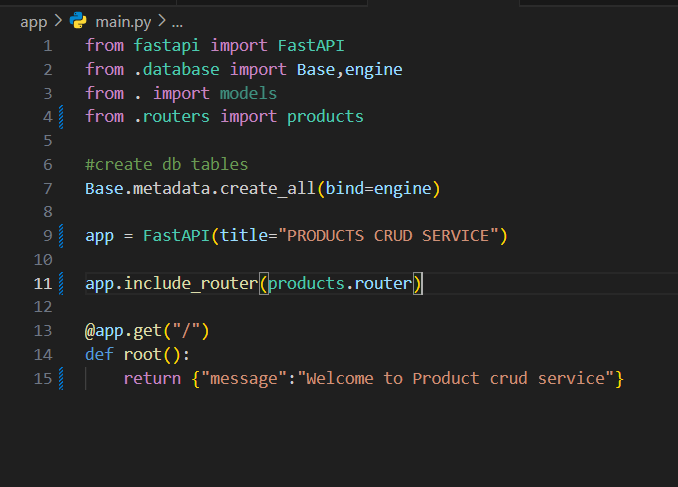
app/main.py
The main.py file is the entry point of your backend project. In this file, we first import all the required packages and create database tables if they are not already created.
Then, we initialize the FastAPI app and include all route modules for better code organization.
"/” : The top-level route of the server.- We import and include product-related routes using the
include_router()function for modularity and cleaner code.
This is the file where you’ll understand FastAPI how to run an application and how to configure routes and endpoints effectively.
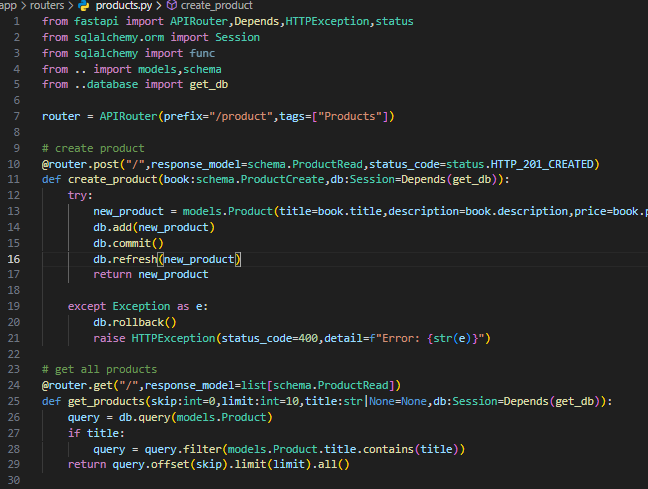
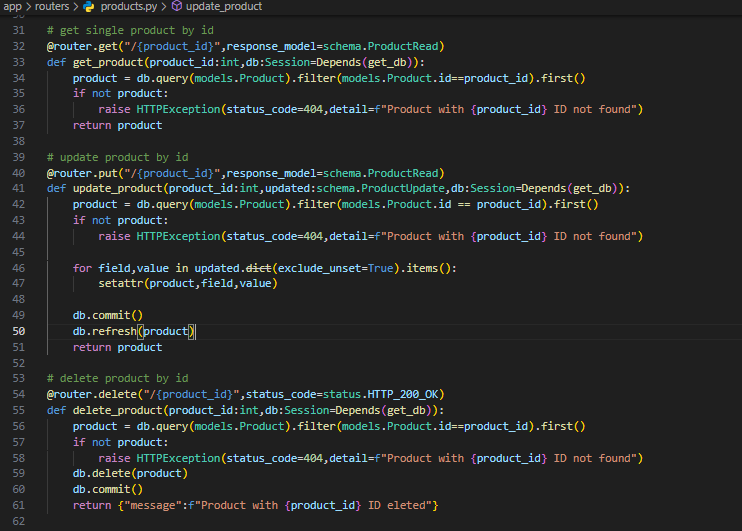
app/routers/product.py
The routers directory allows you to separate different entities into different route files.
For example, in this file (product.py), we handle all CRUD operations FastAPI functions for managing products : create, read, update, and delete.
Here’s a quick overview of what’s happening in this file:
router = APIRouter(prefix="/product", tags=["Products"])- APIRouter : Lets you modularize routes instead of keeping all endpoints in
main.py. - prefix=”/product” : All routes inside this file will start with
/product.
Example: POST /product/ - tags=[“Products”] : Groups all routes under the “Products” section in the Swagger UI (
/docs).
Summary Table
| Component | Role |
|---|---|
| @router.post | Defines API endpoint |
| schema.ProductCreate | Validates input |
| models.Product | ORM class mapping to DB table |
| db.add() / db.commit() | Saves record |
| db.refresh() | Updates local object with DB data |
| get_db() | Provides DB session safely |
| HTTPException | Returns error if something fails |
Example Flow of the First POST Request
Below is an example that demonstrates the CRUD FastAPI Python process for adding a product:
@router.post("/", response_model=schema.ProductRead, status_code=status.HTTP_201_CREATED)
def create_product(product: schema.ProductCreate, db: Session = Depends(get_db)):
    try:
        new_product = models.Product(
            title=product.title,
            description=product.description,
            price=product.price
        )
        db.add(new_product)
        db.commit()
        db.refresh(new_product)
        return new_product
    except Exception as e:
        db.rollback()
        raise HTTPException(status_code=400, detail=f"Error: {str(e)}")
Flow Explanation:
POST /product/
   ↓
Pydantic Schema (ProductCreate) → Validates incoming data
   ↓
SQLAlchemy ORM (Product model) → Creates DB row
   ↓
Session commit → Saves to SQLite
   ↓
Session refresh → Fetches latest data (id, timestamps)
   ↓
Response model (ProductRead) → Filters output fields
   ↓
JSON response → Returned to client
Running the Application and Testing API Endpoints
Once all your files are ready, it’s time to run your application and test all endpoints for your CRUD operations FastAPI project.
To start the server, use the following command:
uvicorn app.main:app --reload --host 0.0.0.0 --port 8000
This command starts your FastAPI app using Uvicorn, which serves as the ASGI server.
This step demonstrates the Uvicorn run FastAPI process, where your app becomes accessible locally.
- –reload : Automatically restarts the server whenever you make code changes.
- –host 0.0.0.0 : Allows access from any network.
- –port 8000 : Specifies the port on which the app runs.
Once you execute this command, your app will be running at:
– http://127.0.0.1:8000
You can also access the automatically generated FastAPI documentation at:
– http://127.0.0.1:8000/docs : Interactive Swagger UI
– http://127.0.0.1:8000/redoc : ReDoc UI
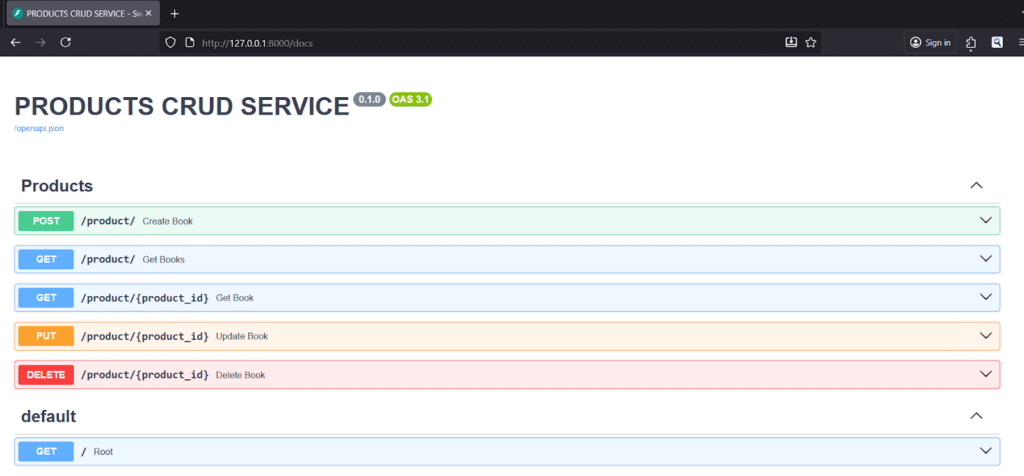
All endpoints will be listed in the documentation. You can test each route directly from the browser to understand how FastAPI works under the hood.
Available API Endpoints
Below are the main endpoints for performing CRUD operations in Python FastAPI using SQLite.
1. Create Product
POST : http://127.0.0.1:8000/product/
Request Body:
{
  "title": "Soap",
  "description": "Bathing Soap",
  "price": 20
}
2. Get All Products
GET : http://127.0.0.1:8000/product/?skip=0&limit=10
3. Get Product by ID
GET : http://127.0.0.1:8000/product/1
4. Update Product by ID
PUT : http://127.0.0.1:8000/product/1
Request Body:
{
  "title": "Soap",
  "description": "Clothes Washing Soap",
  "price": 15
}
5. Delete Product by ID
DELETE : http://127.0.0.1:8000/product/1
These examples demonstrate how to perform FastAPI CRUD operations using SQLite from start to finish.
You’ve now seen how FastAPI works, how FastAPI handles multiple requests, and how to set up endpoints with proper validation, database connectivity, and response handling.
Conclusion and Next Steps
And that’s it!
You’ve now successfully built and run a complete backend application using FastAPI and SQLite, implementing full CRUD operations FastAPI (Create, Read, Update, Delete).
This guide not only helped you understand how FastAPI works and how FastAPI works under the hood, but also how to structure a scalable backend using Python, SQLAlchemy ORM, and Pydantic for validation and serialization.
You learned how to:
- Set up a Python virtual environment
- Install FastAPI and other dependencies
- Connect to a database using SQLAlchemy
- Create database models and schemas
- Build CRUD FastAPI Python endpoints
- Run your app using Uvicorn run FastAPI
- Test routes using the built-in FastAPI documentation
This tutorial is just the beginning! You can further expand this project by:
- Replacing SQLite with PostgreSQL or MySQL
- Adding authentication and authorization using JWT and OAuth2
- Creating user schemas with login/signup endpoints
- Implementing advanced error handling and pagination
- Exploring the official FastAPI documentation for more advanced features
Keep experimenting build, break, and learn!
The more you explore, the more you’ll understand the internals of FastAPI how to run, manage, and scale real-world applications.
Final Thoughts
FastAPI is one of the most efficient and developer-friendly frameworks for Python backend development today. Its performance, ease of use, and powerful async capabilities make it ideal for both beginners and production-grade systems.
Keep reading more FastAPI tutorial blogs, check out the official docs, and practice building new features from real-time APIs to complex microservices.
Thank you for reading!
Happy Coding